বিস্তারিত:Click Shop একটি আধুনিক, হালকা ও দ্রুত লোডিং WordPress থিম, যা ই-কমার্স অভিজ্ঞতাকে করে তোলে আরও মসৃণ এবং পেশাদার। এই থিমটি বিশেষভাবে তৈরি করা হয়েছে ল্যান্ডিং পেজ-স্টাইল প্রোডাক্ট উপস্থাপনের জন্য। CartFlows-এর সঙ্গে সম্পূর্ণ একত্রে কাজ করার মাধ্যমে, কোনো প্রোডাক্টে ক্লিক করলেই ইউজারকে রিডাইরেক্ট করে হাই-কনভার্টিং ল্যান্ডিং পেজে এবং আরো একটি মজার ফিচার হচ্ছে Quick Checkout System। Elementor-এর মাধ্যমে আপনি প্রতিটি সেকশন যেমন—হেডার, ফুটার, প্রোডাক্ট পেজ, My Account ড্যাশবোর্ড, এবং Add to Cart ফর্ম—সহজেই ড্র্যাগ-অ্যান্ড-ড্রপ পদ্ধতিতে কাস্টমাইজ করতে পারবেন। আপনি ডিজিটাল প্রোডাক্ট, ফিজিক্যাল পণ্য অথবা অ্যাফিলিয়েট আইটেম যাই বিক্রি করুন না কেন, **Click Shop** আপনাকে আপনার ইচ্ছেমতো একটি পারফেক্ট অনলাইন স্টোর ডিজাইন করার পূর্ণ স্বাধীনতা দেয়।
এই থিম ইন্সটল করার আগে এগুলো নিশ্চিত করুনঃ
WordPress 5.8+
PHP 7.4+
WooCommerce 8.0.0+
Elementor 3.7.0+
ভিডিও টিউটোরিয়াল
ইন্সটল করার নিয়ম
শুরুতে আপনাকে এই থিমটি কিনতে হবে এই লিঙ্ক থেকে। তারপর Download করে নিন থিমের zip ফাইল।
যদি ওয়ার্ডপ্রেস ড্যাশবোর্ড থেকে আপলোড করতে চান, তাহলে নিচের নিয়ম অনুসরন করুনঃ
আপনার ওয়ার্ডপ্রেস ড্যাশবোর্ড লগিন করুন।
তারপর Appearance > Themes > Add New তে ক্লিক করুন।
ক্লিক করুন Upload Theme বাটনে এবং সিলেক্ট করুন click-shop.zip এই ফাইলটি। যেটি আমাদের ওয়েবসাইট থেকে ডাউনলোড করেছিলেন.
ক্লিক করুন Install Now বাটনে এবং Activate করে নিন।
যদি FTP Client দিয়ে আপলোড করতে চান
থিমটির click-shop.zip ফাইল আনজিপ করুন Winrer অথবা আনজিপ করার যেকোন সফটওয়্যার দিয়ে।
তারপর ফোল্ডারটিকে আপলোড করুন আপনার ওয়ার্ডপ্রেস এর এই ফোল্ডারের ভেতরে /wp-content/themes/ যেকোন FTP Client দিয়ে।
তারপর ড্যাশবোর্ড লগিন করে Appearance > Themes এ গিয়ে একটিভ করে নিন।
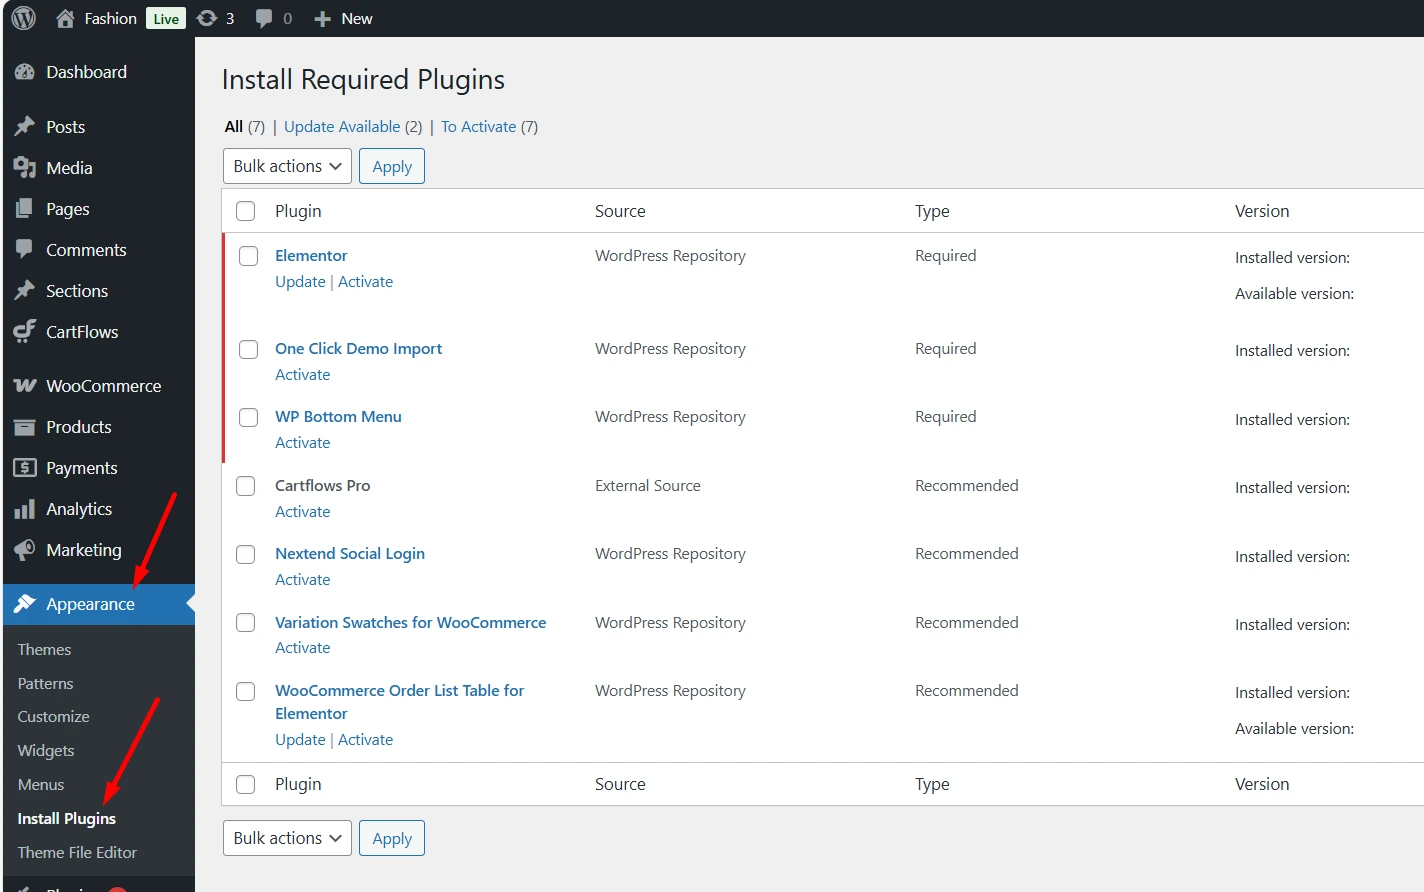
প্রয়োজনীয় প্লাগিন
এই থিমটির পুরো ফিচার পেতে হলে নিচের এই প্লাগিনগুলো একটিভ করে নিবেন। থিমটি Active করার পর পরই একটি নোটিশ আসবে এই সকল প্লাগিন একটিভ করার জন্য। বা Appearance>Install Plugins এ গিয়ে সকল প্লাগিন একটিভ করে নিন।
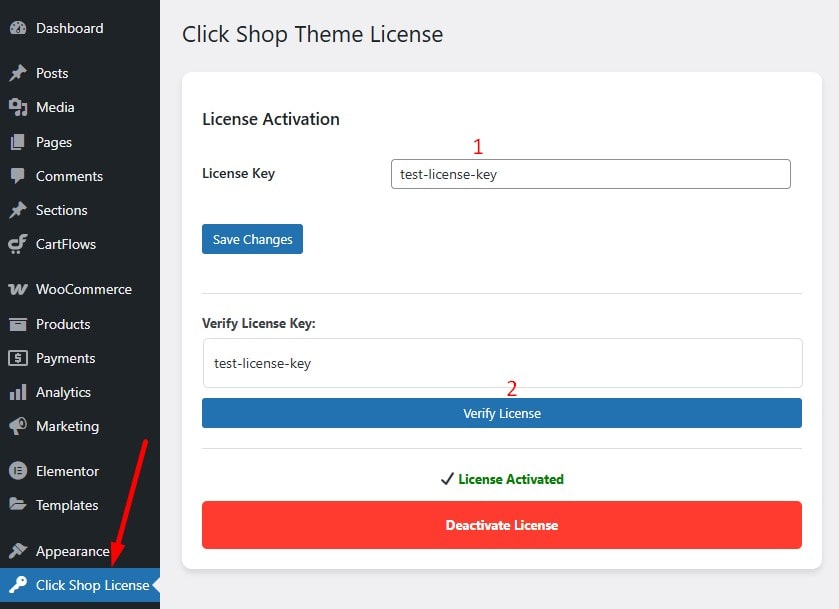
ড্যাশবোর্ড থেকে WP-Admin > Click Shop License এখানে যান।
License Key নামের একটি খালি ঘর পাবেন, এখানে আপনাকে প্রভাইড করা বা WP Methods থেকে পাওয়া থিমের সাথে লাইসেন্স কি বসাতে হবে।
License Key বসানোর পর Save Changes এই বাটনের ক্লিক করুন। তারপর এই লাইসেন্সটিকে Verify করার জন্য Verify License এই বাটনের ক্লিক করুন। যদি দেখেন নিচের মত License Activated দেখাচ্ছে তাহলে বুঝে নিবেন কাজ হয়েছে।
বিদ্রঃ যদি পরবর্তীতে সাইট রিসেট করার দরকার হয়, তাহলে Deactivate License এ ক্লিক করে Deactivate করে নিন। অন্যথায় আবার যখন লাইসেন্স একটিভ করতে যাবেন একটিভ হবে না।
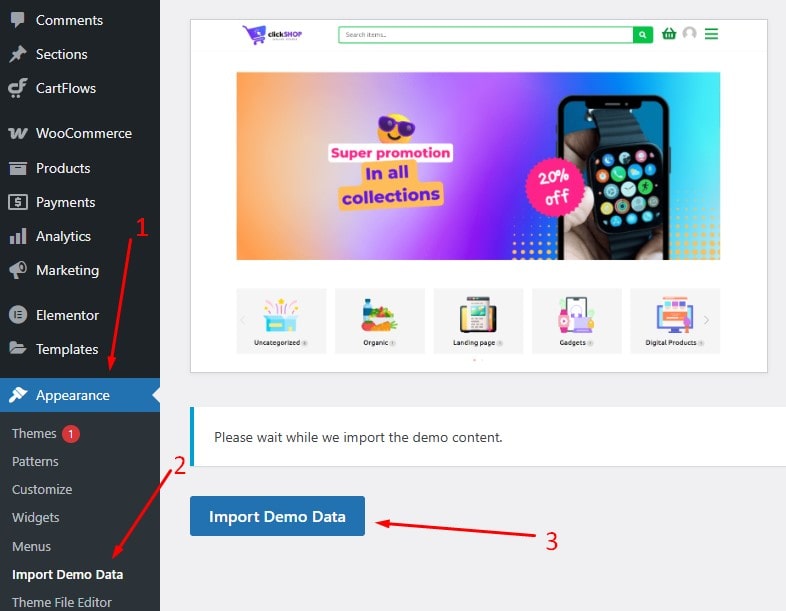
ডেমো ইম্পোট করার নিয়ম।
এই থিমের একাধিক ডেমো রয়েছে। আপনি আপনার যেকোন একটি পছন্দের ডেমো ইম্পোট করে সহজেই সাইটের ডিজাইন করে ফেলতে পারবেন।
যার জন্য আপনাকে যেতে হবে Appearance > Import Demo Data এখানে
তারপর ক্লিক করুন Import Demo এই বাটনে।
কিছুক্ষন আপনাকে অপেক্ষা করতে হবে, যতক্ষন পর্যন্ত এটি Demo Imported নোটিশ না দেখায়।
তারপর আপনার ওয়েবসাইট ভিজিট করে দেখুন, দেখবেন সবকিছু ঠিক Demo এর মতই দেখাচ্ছে।
বিদ্রঃ এখানে কিছু সমস্যা হতে পারে, যদি দেখেন শো হচ্ছে না সবকিছু ঠিক মত। তাহলে এখানে দেখুন।
থিম কাস্টমাইজেশন বা কন্টেন্ট পরিবর্তন।
General Settings - কাস্টমাইজার
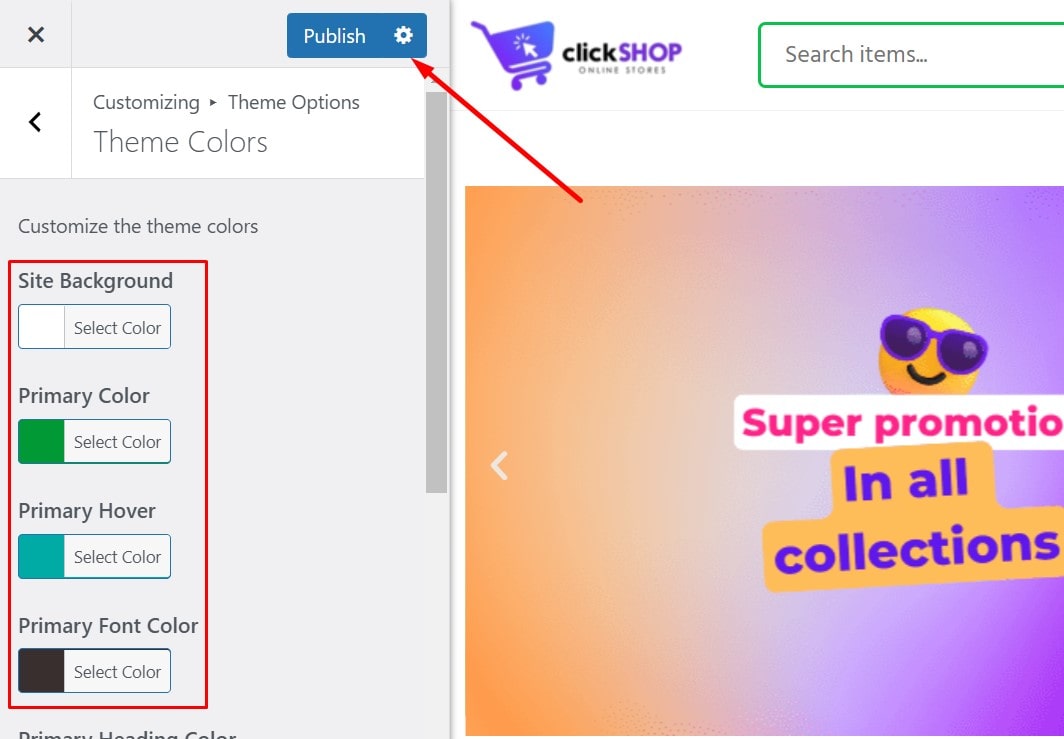
আপনাকে ড্যাশবোর্ড থেকে Appearance > Customize এ যেতে হবে। তারপর নিচের মত একরকম পেইজ দেখবেন।
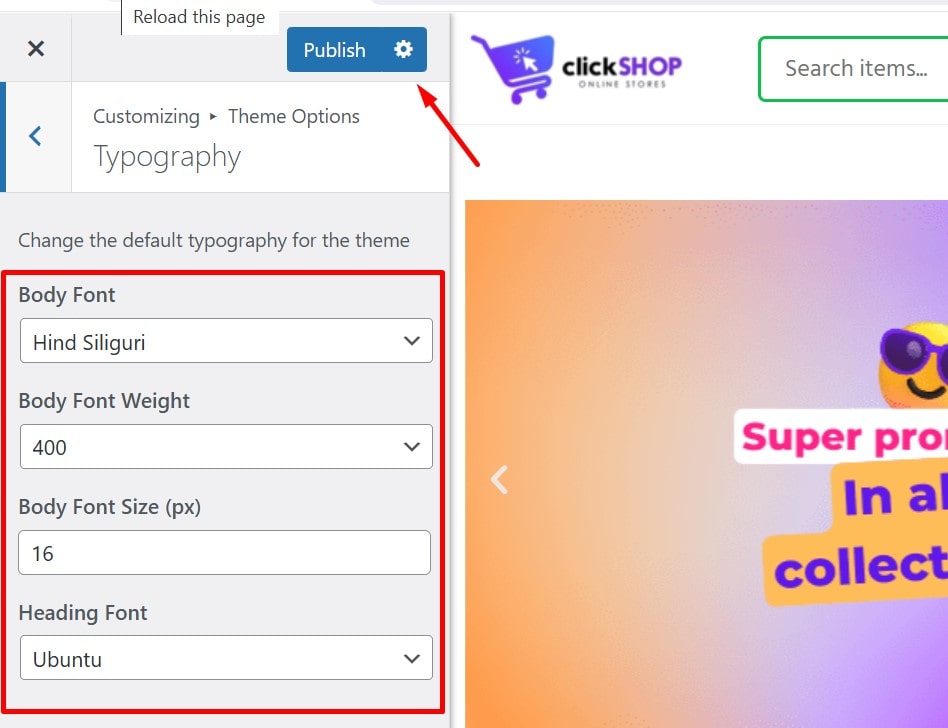
তারপর এখানে যাবেন Theme Options > Theme Colors এখান থেকে এই থিমের primary color, link color, button color ইত্যাদি পরিবর্তন করতে পারবেন।
এবং Theme Options > Typography এখান থেকে আপনি Body font, Body font weight ইত্যাদি পরিবর্তন করতে পারবেন।
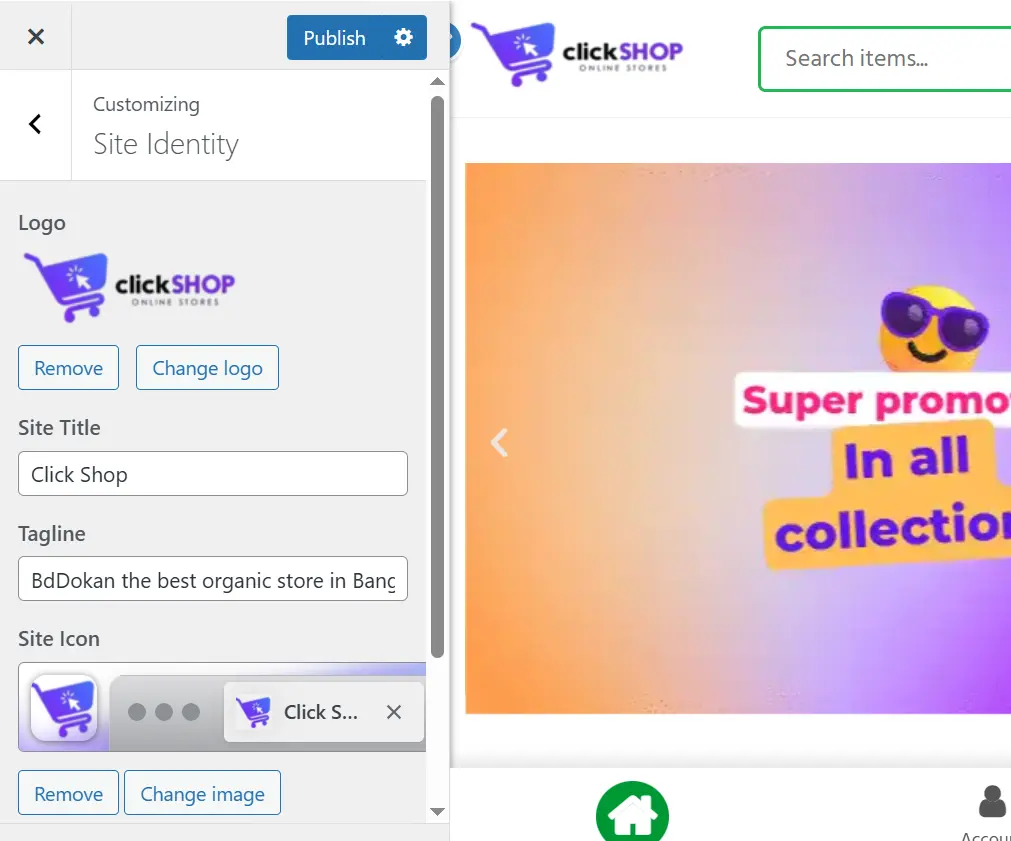
লগো, সাইট টাইটেল, টেগলাইন বা শিরোনাম পরিবর্তন করতে Appearance > Customize এখানে যাবেন। এবং আপনার নিজস্ব লগোসহ বাকিগুলো পরিবর্তন করুন।
হেডার এবং ফুটার কাস্টমাইজ
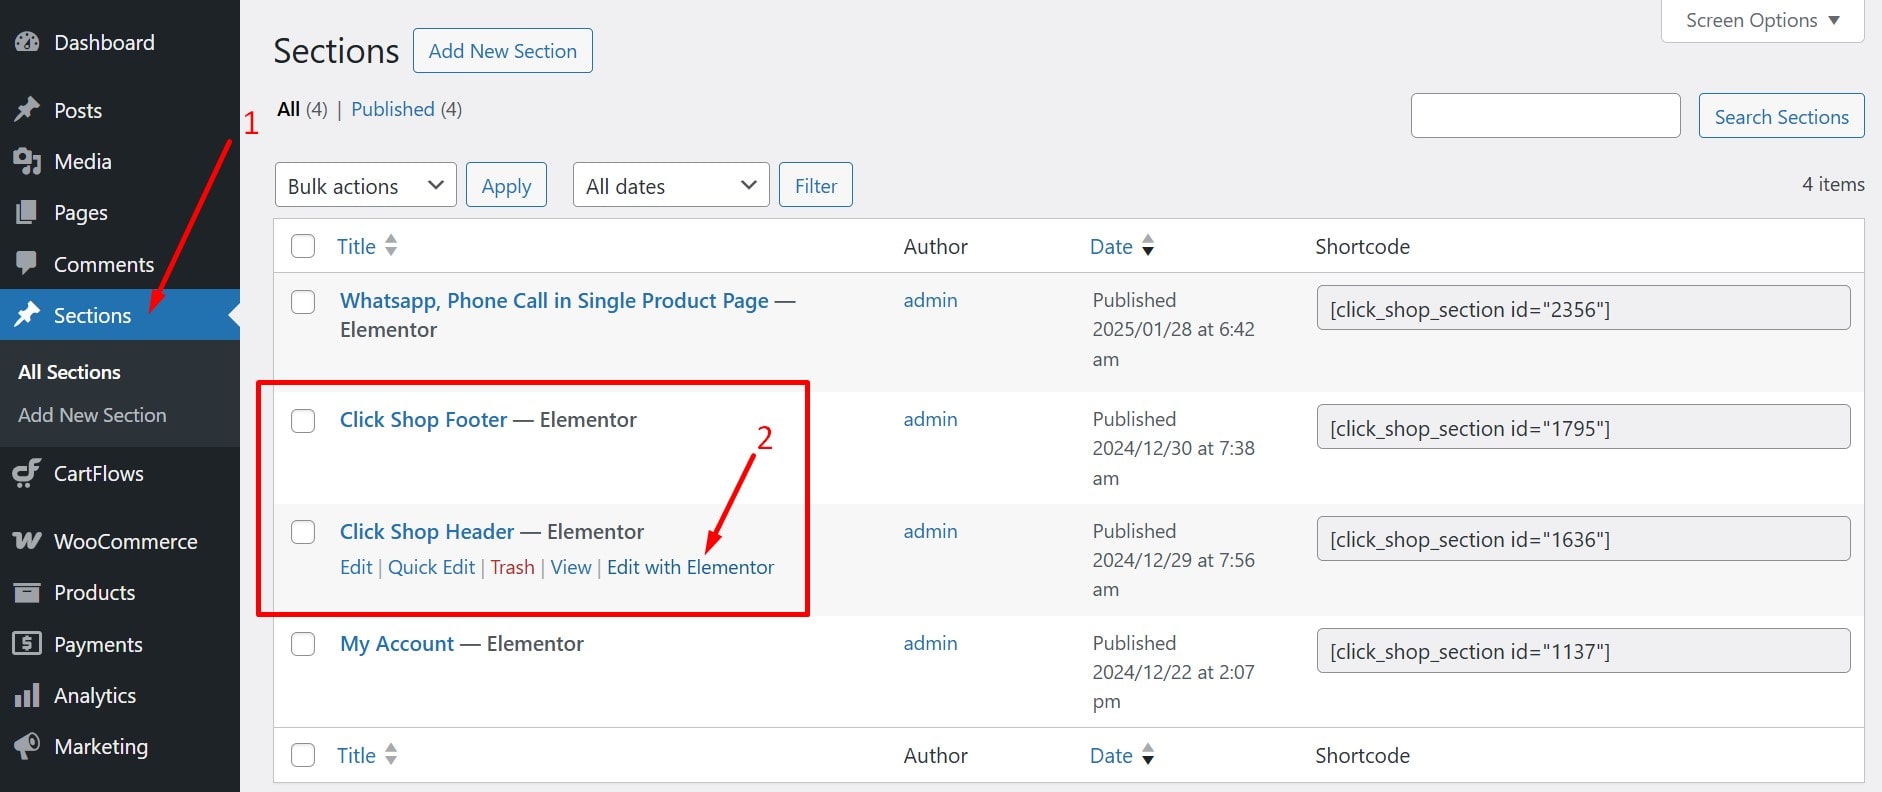
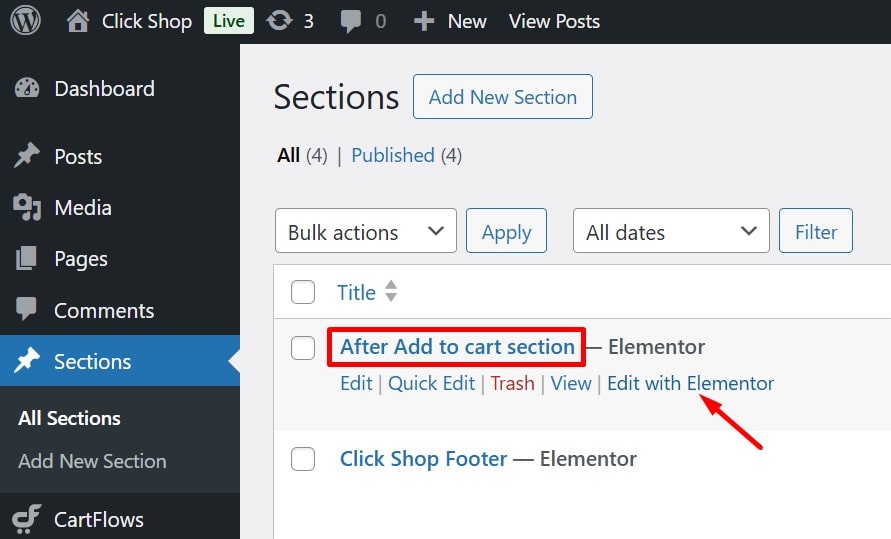
হেডার এডিট: এর জন্য ড্যাশবোর্ড থেকে Sections > All Sections এ যাবেন। তারপর Edit with Elementor এখানে ক্লিক করলে এলিমেন্টর এডিটর ওপেন হবে।
এখান থেকে আপনি এই সেকশনের সকল কনটেন্ট পরিবর্তন, ডিজাইন, নতুন কিছু যোগ করা, ইত্যাদি করতে পারবেন।
একইভাবে আপনি ফুটারের সকলকিছু ডিজাইন এবং পরিবর্তন করতে পারবেন।
মেনু আইটেম পরিবর্তন ও আইকন বা ইমেজ সেট করা।
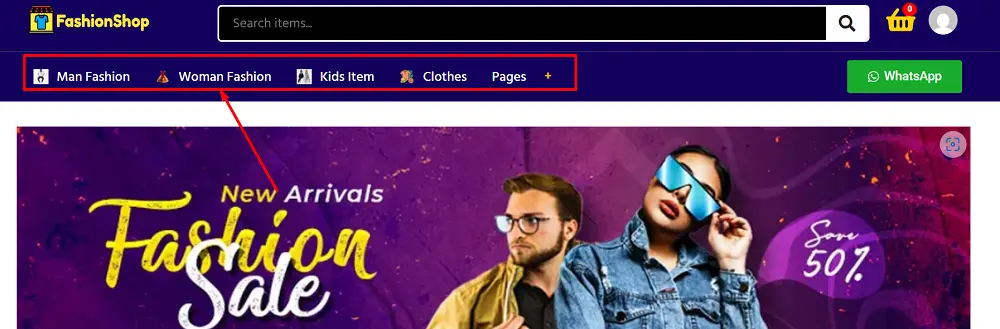
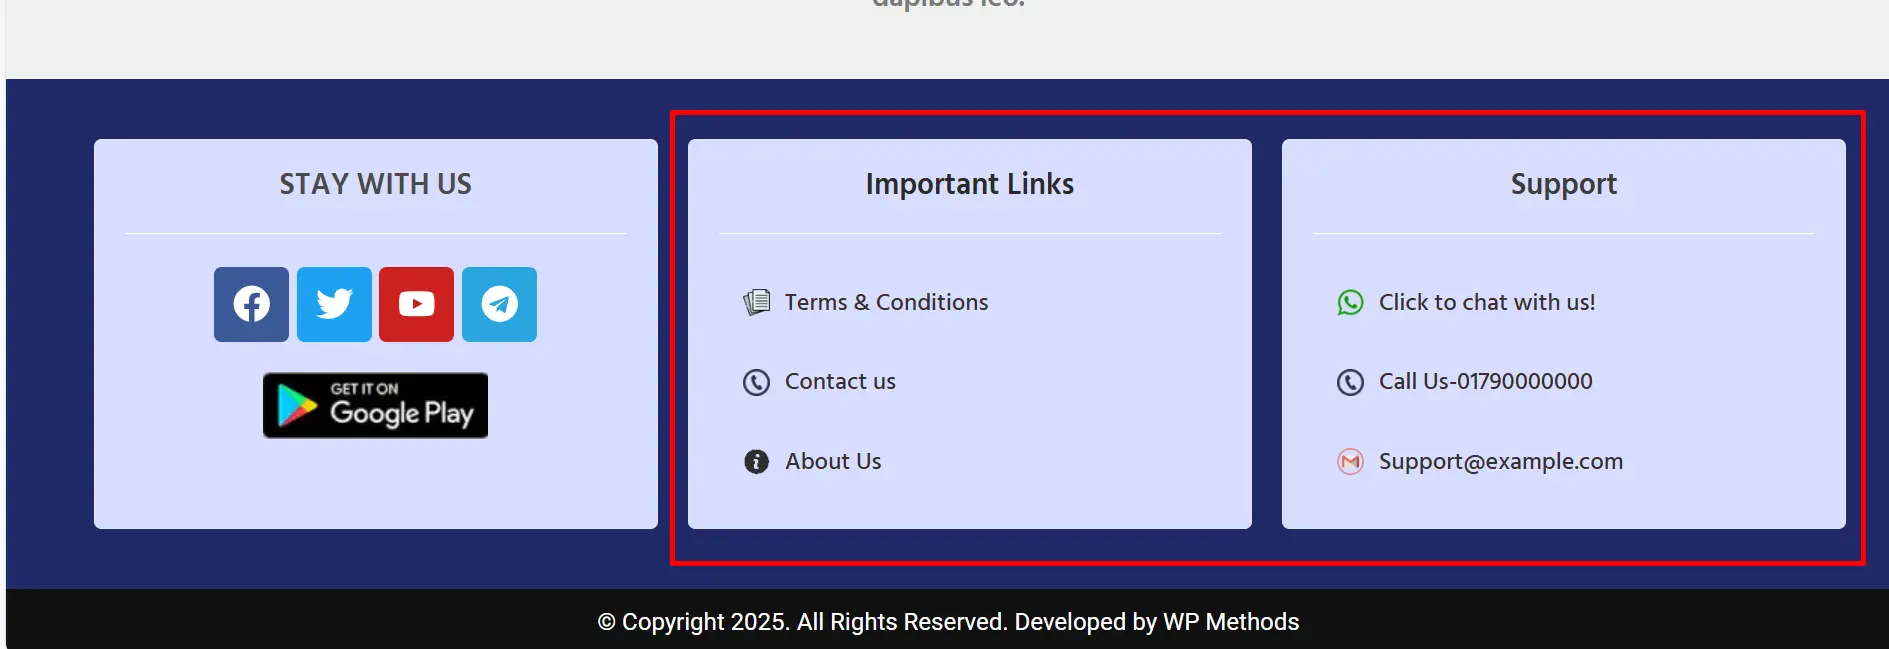
নিচের ছবিতে দেখুন হেডারে একটি মেনু রয়েছে এবং আইটেমগুলোর সাথে ছবিও যোগ করা হয়েছে। এটি আপনি খুব সহজেই সেট করতে পারবেন।
খুব সহজেই Elementor Page Builder দিয়ে এগুলো কাস্টমাইজ করতে পারবেন। যেমন কালার পরিবর্তন, ফন্ট পরিবর্তন, ব্যকগ্রাউন্ট কালার ইত্যাদি।
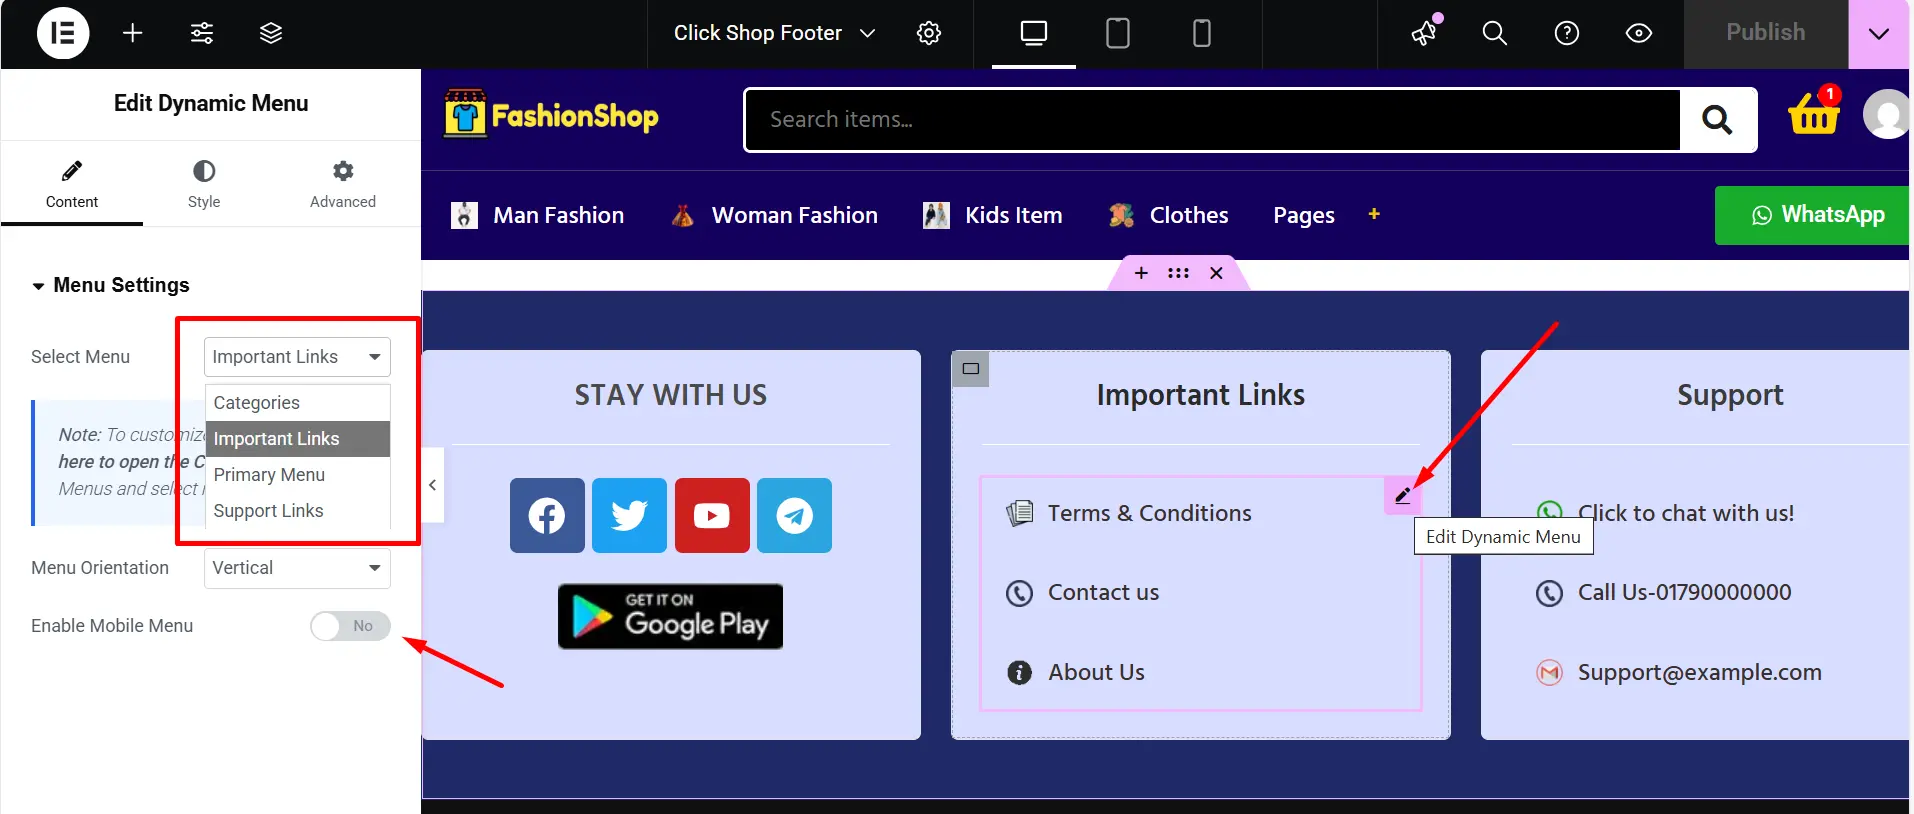
যেমন আপনি যদি Footer Menu গুলো কাস্টমাইজ করতে চান তাহলে Footer কেও Header এর মত Edit with elementor এ ওপেন করবেন। তারপর নিচের মত দেখতে পাবেন। পেন্সিল আইকনে ক্লিক করলে বাম পাশের সাইডবার থেকে আগে থেকে তৈরি করা Menu সিলেক্ট করতে পারবেন।
এবং Menu Orientation থেকে সিলেক্ট করতে পারবেন verticale নাকি Horizontal ভাবে শো করাবেন। আমরা Footer এর জন্য Vertical সিলেক্ট করেছি। এবং মোবাইল Responsive বন্দ করে রেখেছি।
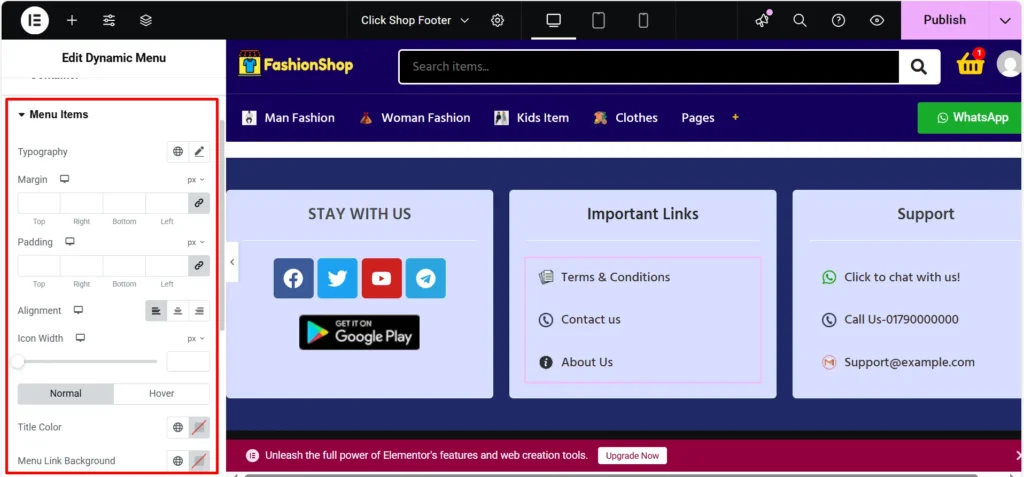
Style Tab থেকে menu items color, typography, fonts ইত্যাদি পরিবর্তন করতে পারবেন।
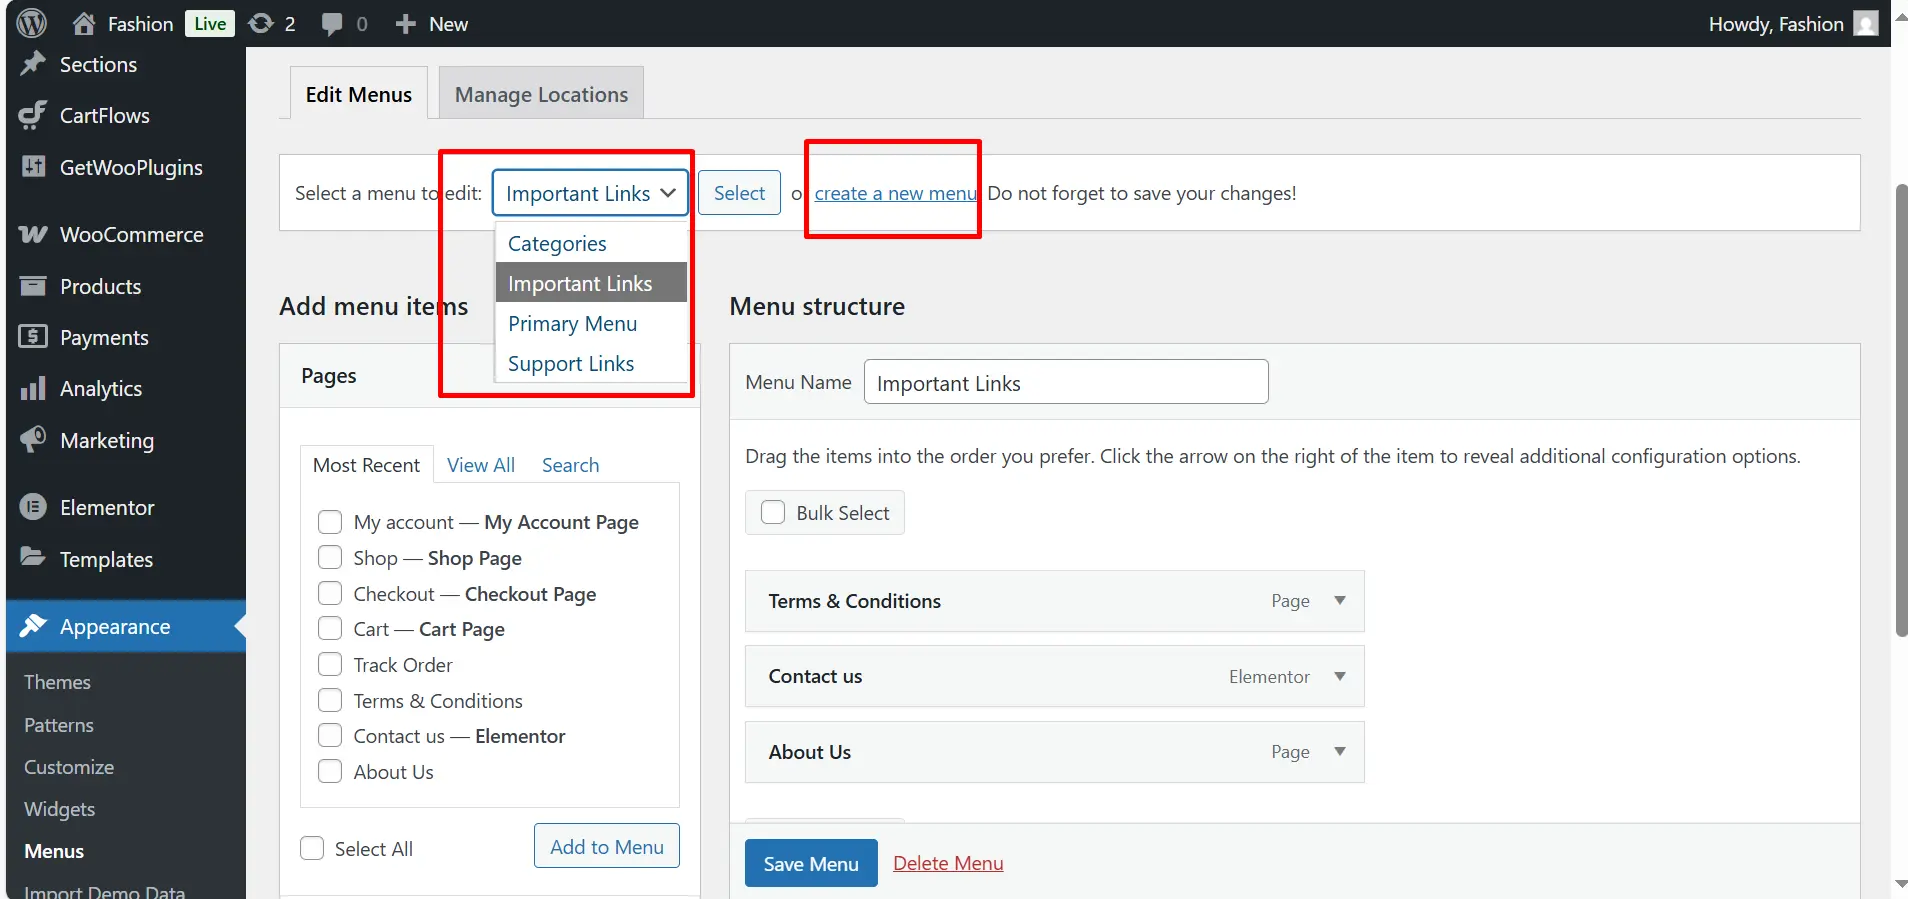
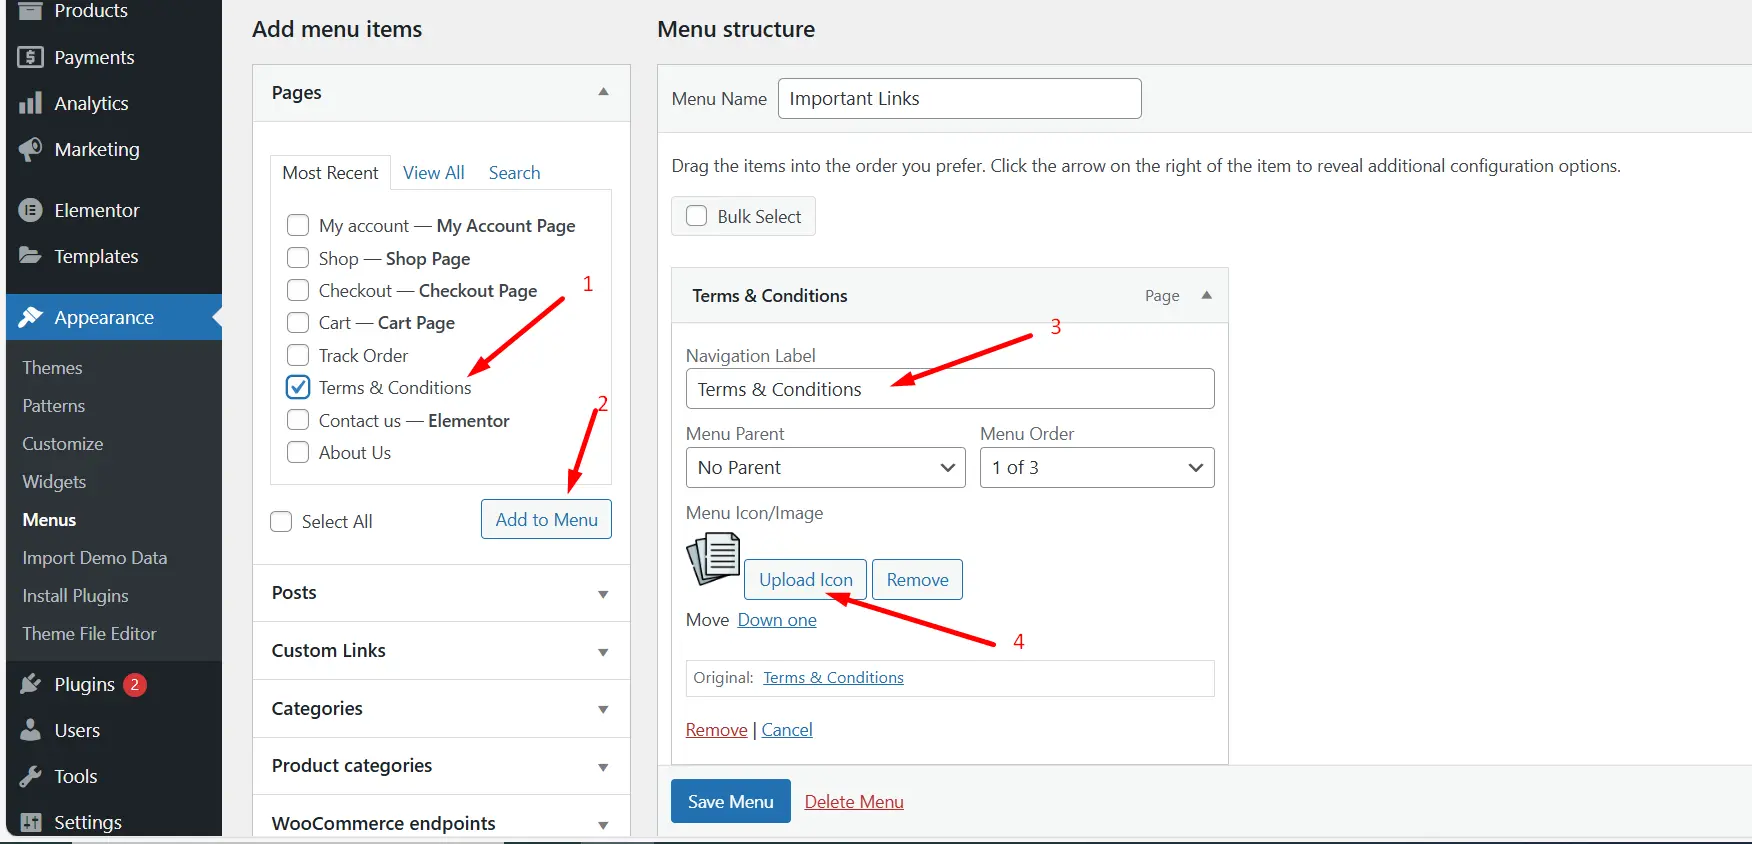
ডিজাইন করার পালা শেষ করে এবার আইটেমগুলো পরিবর্তন করবো। তার জন্য wp-dashboard থেকে Appearance > Menus এখানে যাবেন।
এখান থেকে আপনি সিলেক্ট করতে পারবেন যেগুলোর আইটেম আপনি পরিবর্তন করতে চাচ্ছেন। অথবা নতুন Menu বানাতে পারবেন।
তারপর সাইডবার থেকে যে আইটেম বা পেইজ লিঙ্ক এড করতে চান ওগুলো সিলেক্ট করে Add to Menu বাটনে ক্লিক করুন।
তারপর লেভেল সেট করুন (যদি চান), Menu Icon/Image থেকে png ফরমেটের ইমেজ সেট করতে পারেন, যেটি মেনু আইটেমের পাশে শো হবে।
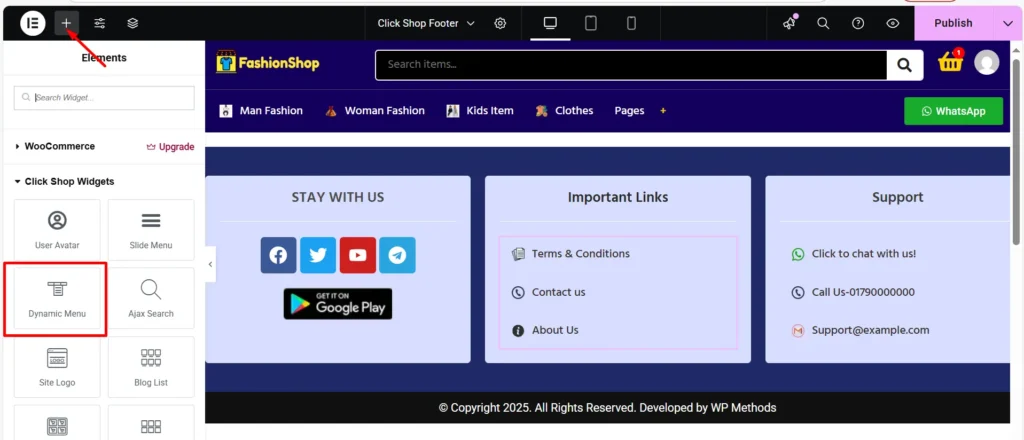
আপনি যদি চান আপনার Elementor Section এ নতুন মেনু যোগ করতে তাহলে আপনি ছবির মত + আইকনে ক্লিক করুন, এবং Dynamic Menu এই Widget টি নির্বাচন করুন।
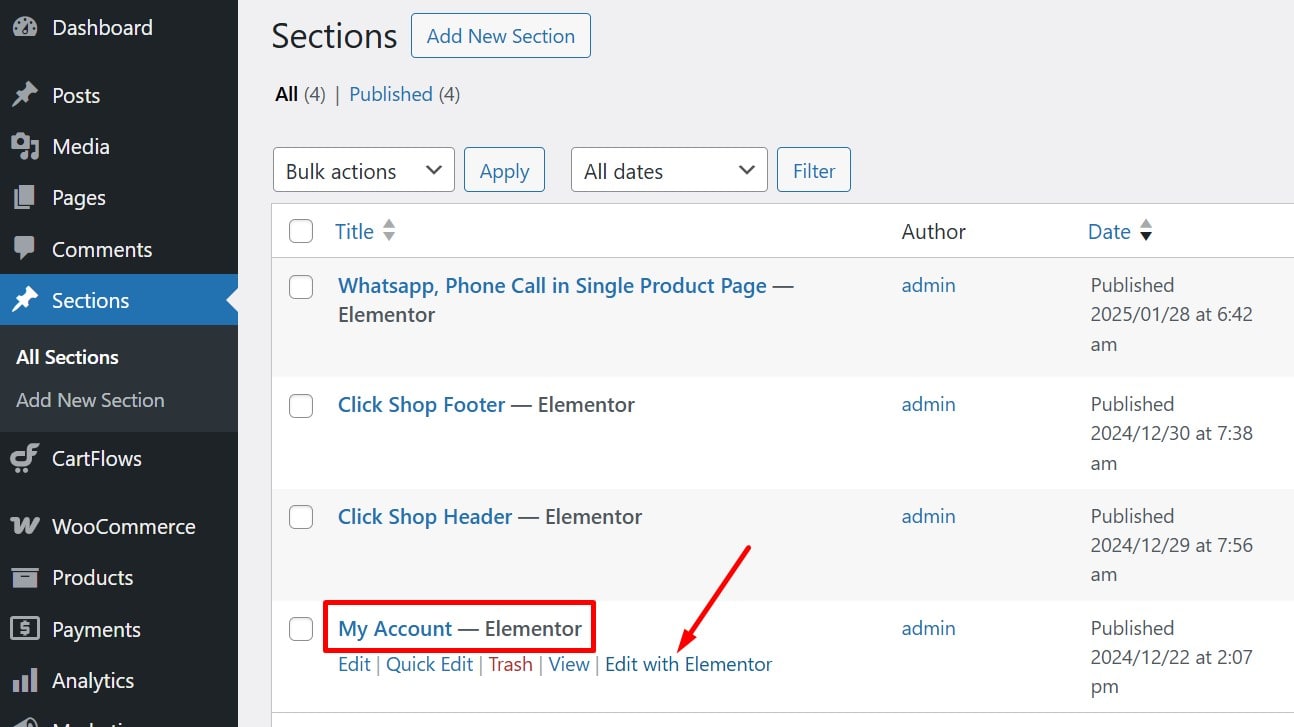
My Account পেইজ কাস্টমাইজ
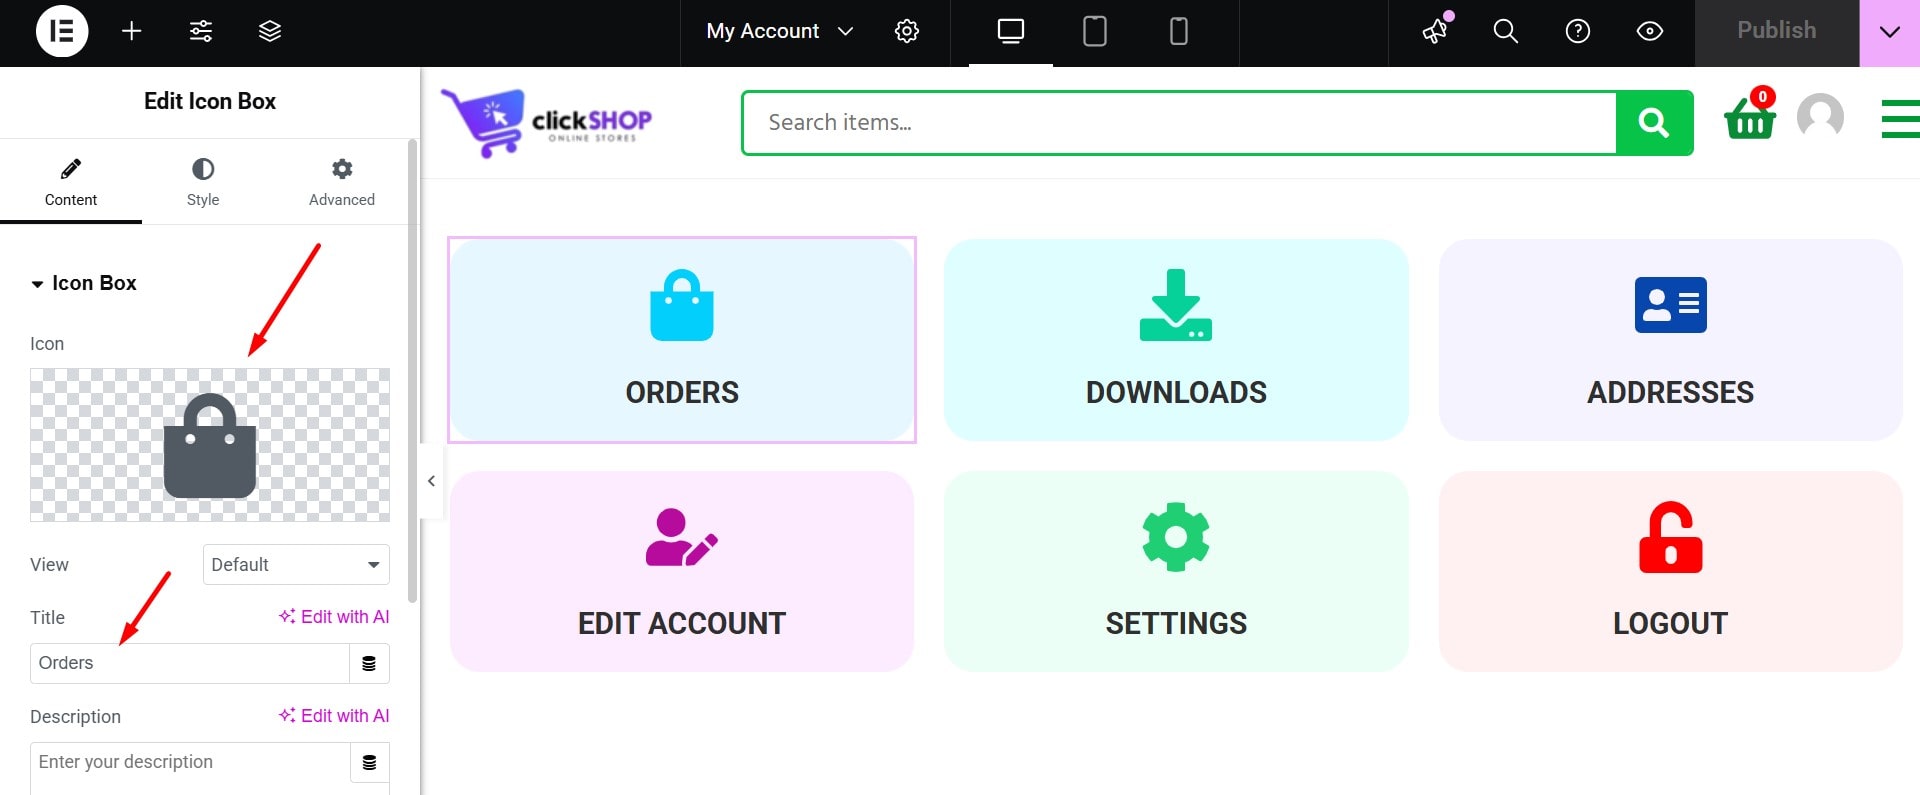
আবারো আপনি Sections > All Sections গিয়ে My Account এর Edit with Elementor ক্লিক করে এডিট অপশনে যাবেন।
তারপর এখান থেকে Icons, Text, Background Color, Links ইত্যাদি পরিবর্তন করতে পারবেন।
After Add To Cart Section - এডিট
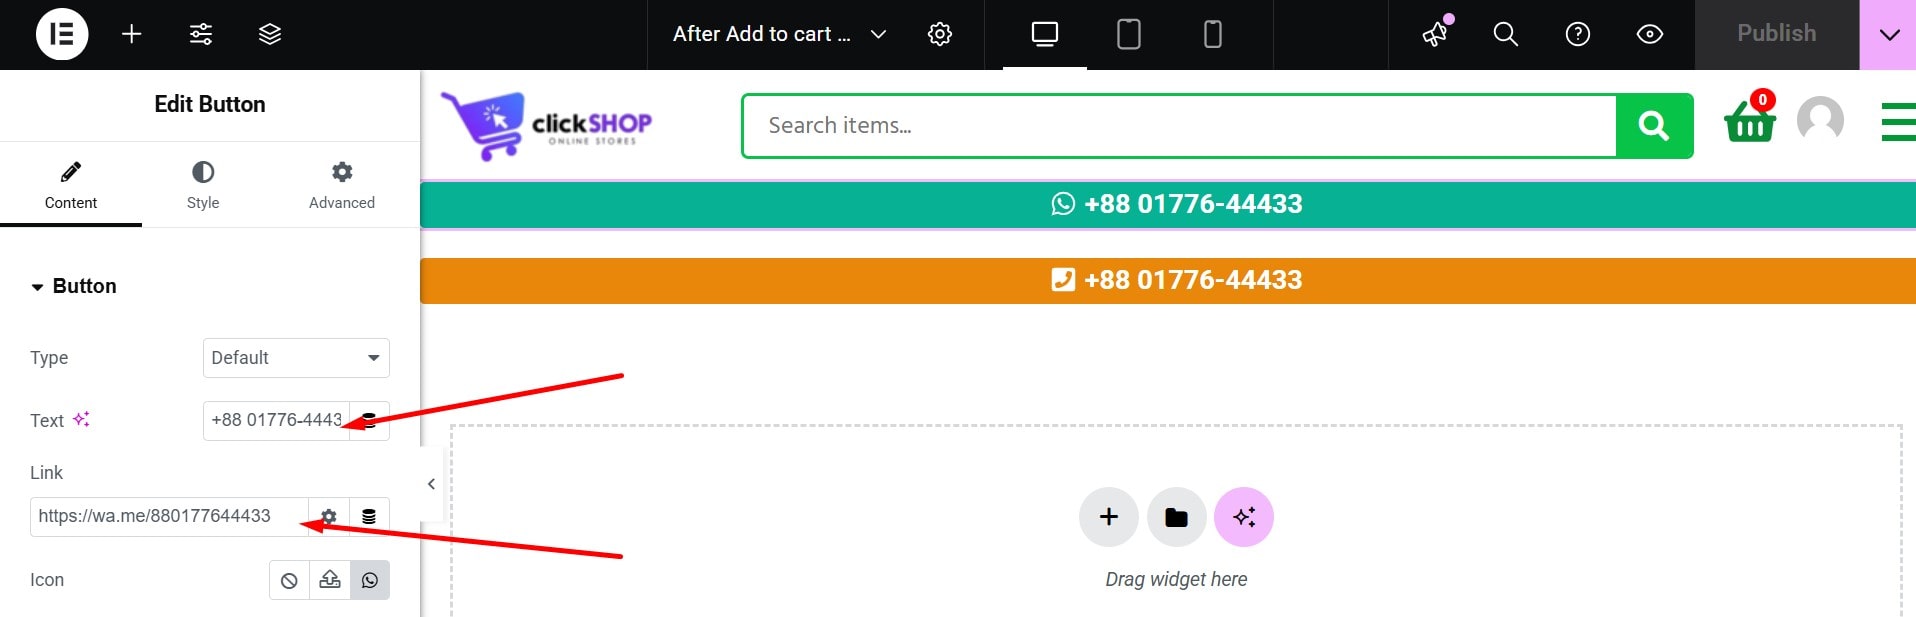
প্রোডাক্ট ডিটেইল পেইজের Add to cart বাটনের নিচে Elementor ডিজাইন যোগ করতে পারবেন। যেমন এই থিমে Whatsapp এবং Mobile Number এড করা হয়েছে। আপনি চাইলে এগুলো একইভাবে এডিট করতে পারবেন।
যেটি Sections>All Sections> After Add to cart section এখান থেকে Edit with Elementor ক্লিক করে পরিবর্তন করবেন।
নিচের ছবিতে দেখুন যেটি পরিবর্তন করতে চান শুধু পেন্সিল আইকে ক্লিক করুন। তারপর WhatsApp, Phone Number পরিবর্তন করে নিন।
WooCommerce Shop Page - প্রোডাক্ট লুপ কাস্টমাইজ
আবারো Appearance > Customize এ যান।
তারপর WooCommerce > Product Catalog: এখান থেকে আপনি product title, add to cart, buy now button ইত্যাদি এবং button background, border colors ইত্যাদি পরিবর্তন করতে পারবেন।
কার্ট এবং চেকআউট পেইজ
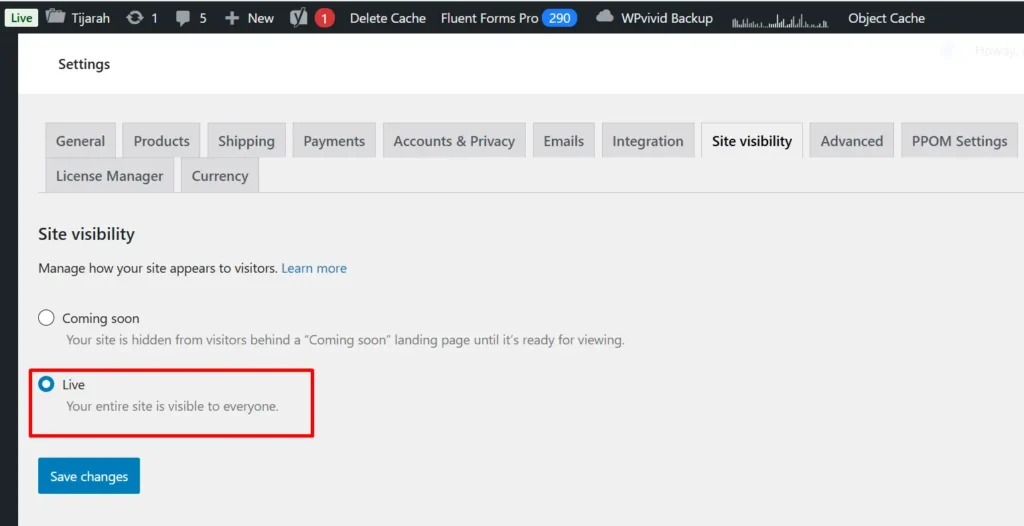
সাইট লাইভ করুন WooCommerce থেকে
Live WooCommerce: এর জন্য WoCommerce>Settings>Site Visibility এখান থেকে Live সিলেক্ট করে সেভ করুন। তারপর দেখবেন Cart & Checkout পেইজ কাজ করবে।
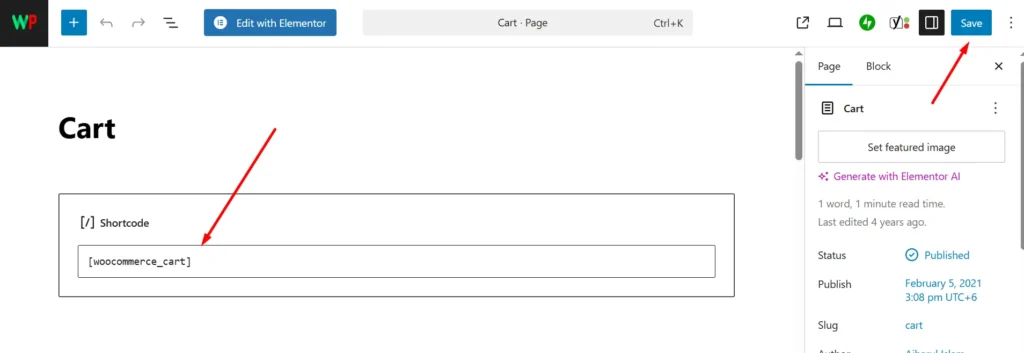
Cart Page শর্টকোড: যদি কোন কারণে আমাদের থিমের মত Cart পেইজের ডিজাইন শো না হয়। তাহলে আপনি Dashboard থেকে Pages>All Pages>Cart এই পেইজ এডিট করবেন, না পেলে নতুন পেইজ বানাবেন। এবং এর ভেতরে যাই পাবেন সব ডিলেট করবেন। তারপর + বাটনে ক্লিক করে Shortcode সিলেক্ট করে নিচের ছবির মত shortcode টি ব্যবহার করুন। তারপর সেভ করুন।
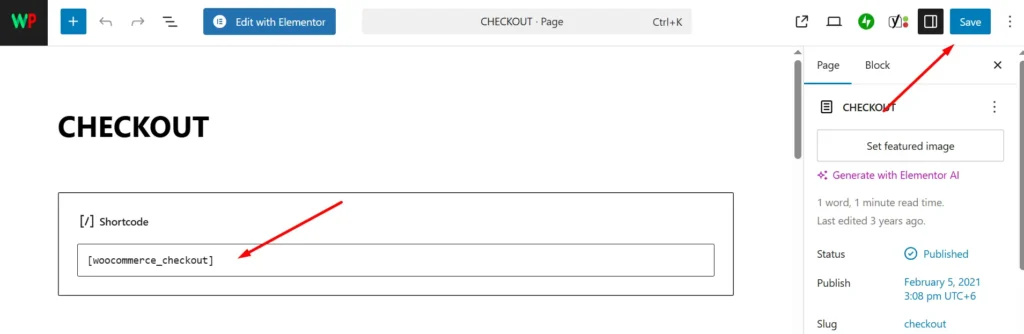
Checkout Page Shortcode: একইভাবে যদি কোন কারণে Checkout পেইজের কনটেন্ট Woocommerce Shortcode দিয়ে শো করা তে চান, তাহলে Dashboard>Pages>All Pages>Checkout এটি এডিট করুন। না পেলে বানাবেন নতুন পেইজ। সেখানে যদি কোন কিছু দেখতে পান সব ডিলেট করে + বাটনে ক্লিক করে Shortcode এড করুন ছবির মত করে।
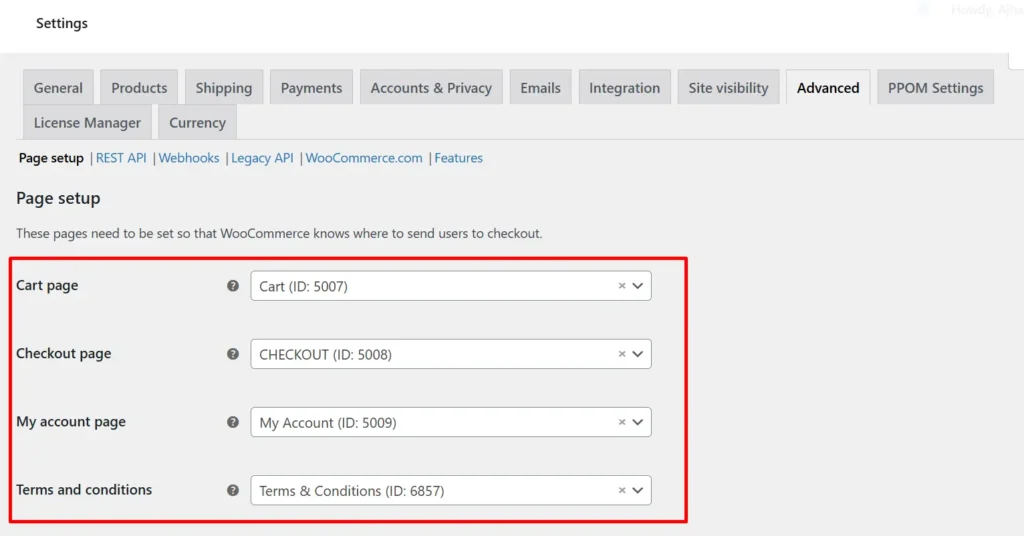
বিদ্রঃ এখানে যদি Cart and Checkout পেইজ না পেয়ে নতুন পেইজগুলো বানান তাহলে ওই পেইজগুলো আপনাকে WooCommerce>Settings>Advance Tab এখান থেকে দেখিয়ে দিতে হবে।
পপ-আপ কুইক চেকআউট
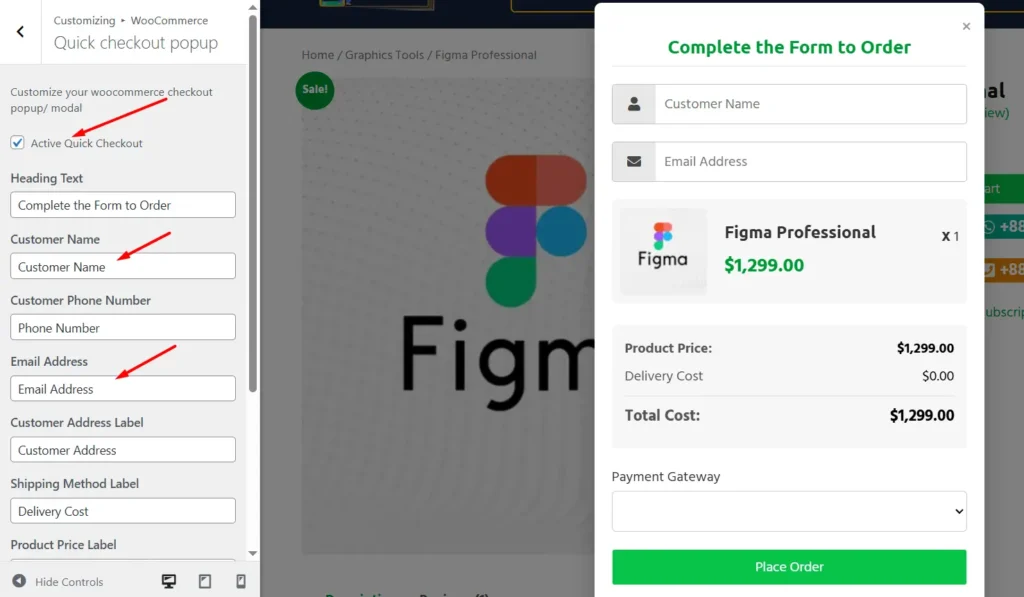
এই সিস্টেম একটিভ এবং কাস্টমাইজ করতে হলে আপনাকে Customize> WooCommerce> Quick Checkout Popup এখানে যেতে হবে।
তারপর Active quick checkout এখানে চেক করে একটিভ করুন। এবং চাইলে আপনি ফিল্ডগুলোর লিখাগুলোও পরিবর্তন করতে পারবেন।
ফেক অর্ডার ব্লকিং সিস্টেম
সিঙ্গেল প্রোডাক্ট পেইজ কাস্টমাইজ
হোমপেজ, শপ পেইজ, ক্যাটাগরি কাস্টমাইজ
ডেমো পরিবর্তন করা
ল্যন্ডিং পেইজ টাইপ প্রোডাক্ট
থিম আপডেট
অবশ্যই থিমএর নতুন ভার্সন আপডেট করার আগে আপনার পুরো সাইট Backup করে নিতে হবে। যাহাতে যদি কোন এরর আসে আপনার সাইটকে আগের অবস্থায় ফিরিয়ে আনতে পারেন। এই ক্ষেত্রে WPvivid এই প্লাগিনটি ব্যবহার করতে পারেন।
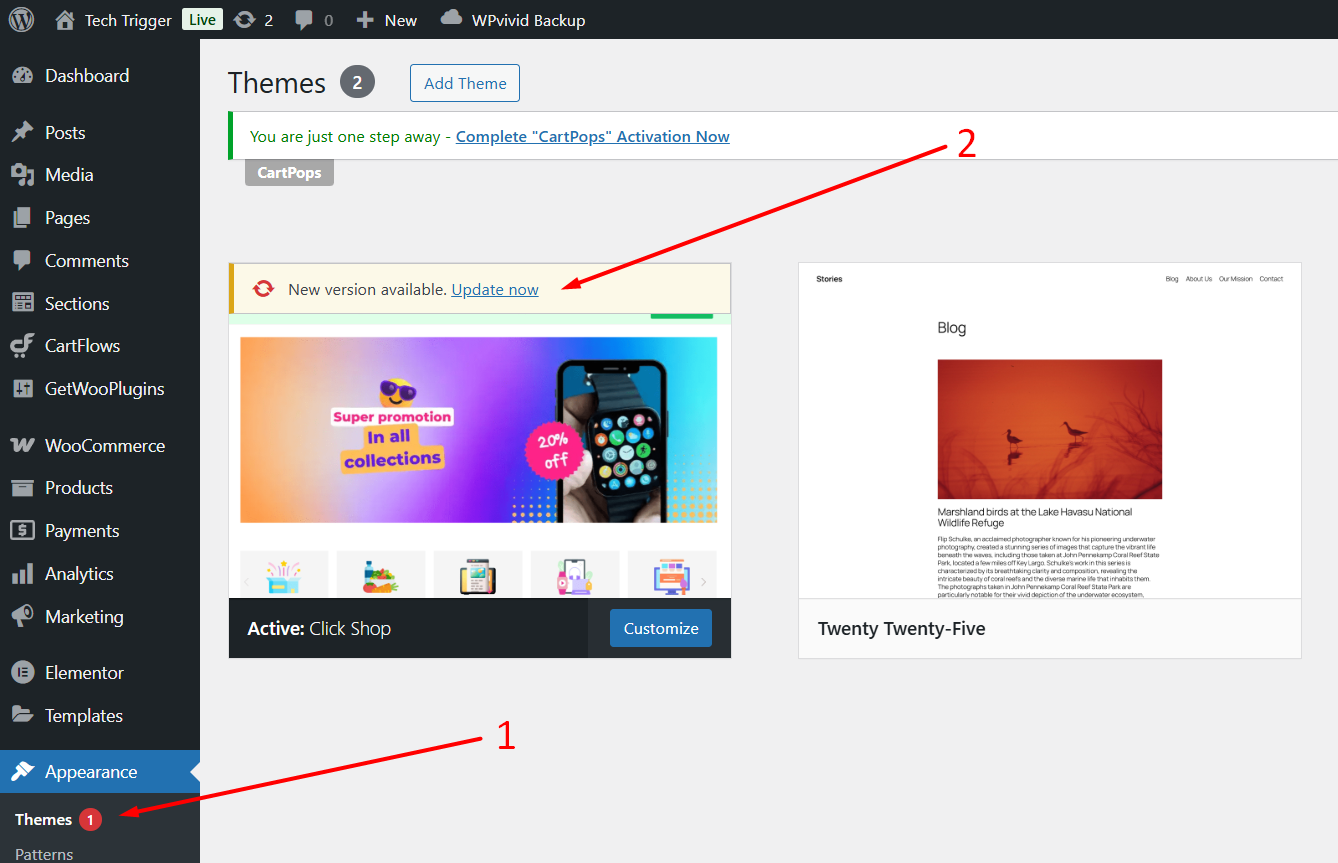
Appearance>Themes এ গেলে, তারপর যদি এই থিমের আপডেট আসে তাহলে এরকম দেখতে পারবেন ছবির মত।
তারপর Update Now তে ক্লিক করবেন।
কিছু সমস্যা হলে তার সমাধান
সমস্যা: Demo import failed এরর।
সমাধান ১: সিউর হোন সকল Reqired প্লাগিন ইন্সটল এবং একটিভ করেছেন।
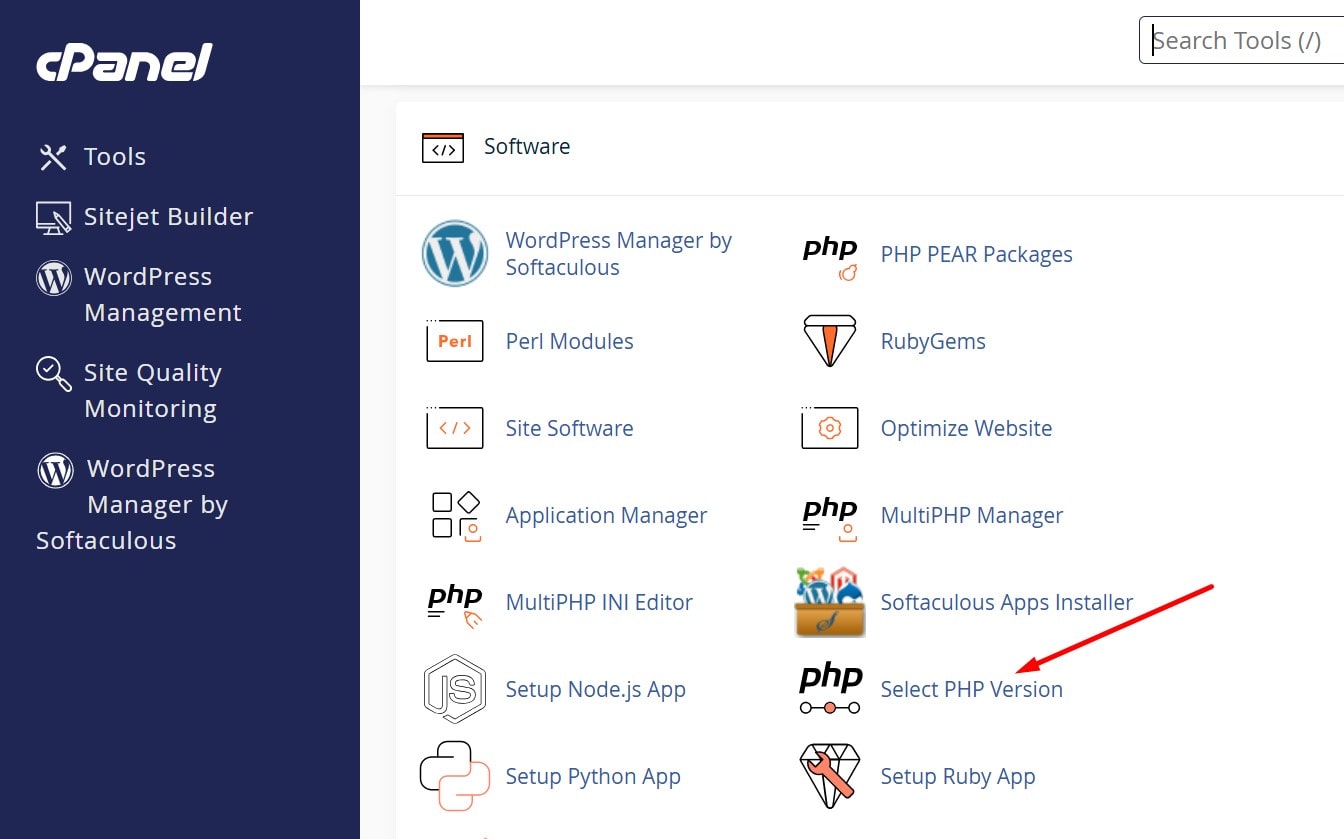
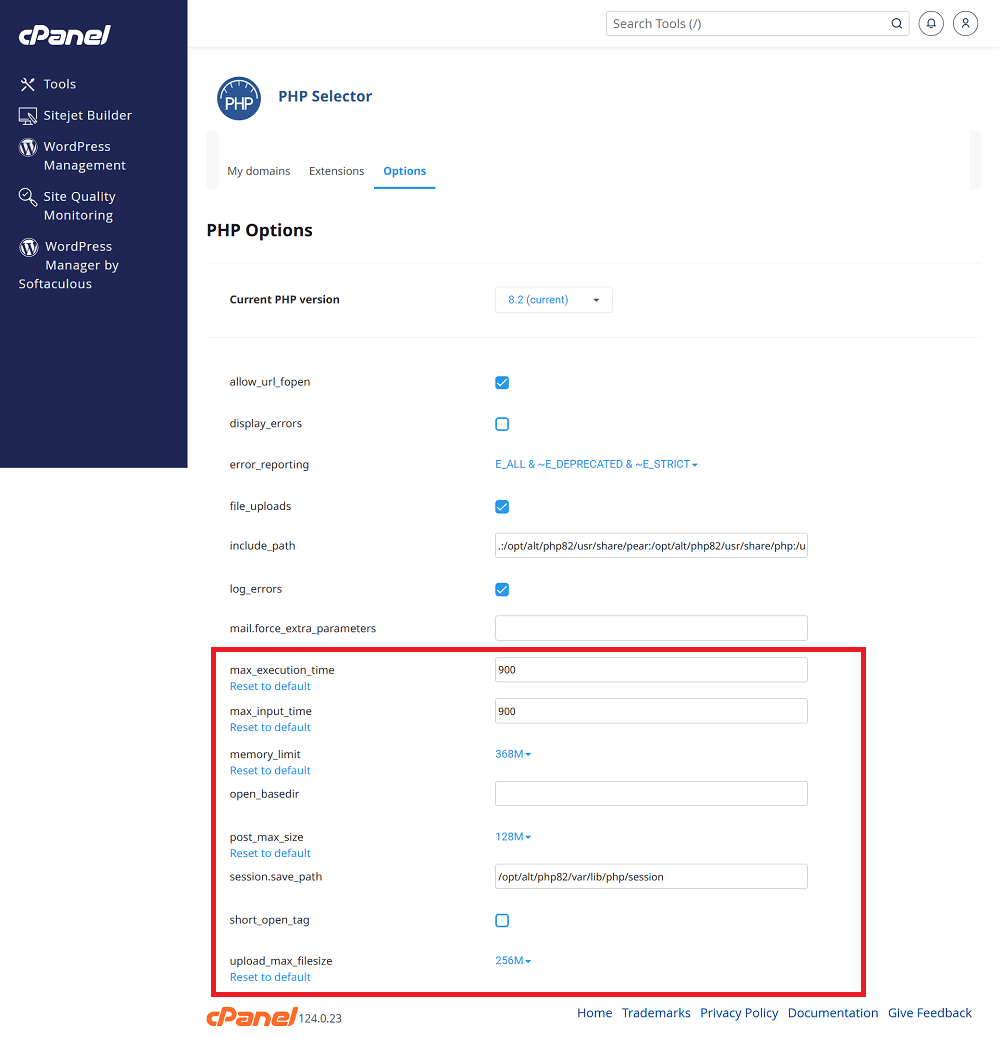
এগুলো বাড়িয়ে দিন ছবির মত করে max_execution_time, max_input_time, memory_limit, upload_max_filesize.
সমস্যা: থিমের স্টাইল কাজ করছে না।
সমাধান ১: সকল ক্যাশ ক্লিয়ার করুন, এবং Private window থেকে ভিজিট করুন।
সমাধান ২: ড্যাশবোর্ড থেকে Elementor>Tools এ যান। এখান থেকে Clear Files & Data এবং Sync Library এখানে ক্লিক করুন। Save changes এ ক্লিক করুন। আশা করি কাজ করবে।
সমস্যা: 404 not found যদি কোন পেইজ বা প্রডাক্ট ভিজিট করতে যাই।
সমাধান: এটি ঠিক করার জন্য ড্যাশবোর্ড থেকে Settings>Permalinks এ গিয়ে Post name সেট করে একদম নিচে গিয়ে Save changes বাটনে ক্লিক করুন। তারপর ভিজিট করে দেখুন।
WP Methods uses cookies to improve your experience. We'll assume you're ok with this, but you can opt-out if you wish. AcceptRead MoreReject
Privacy & Cookies Policy
Privacy Overview
This website uses cookies to improve your experience while you navigate through the website. Out of these, the cookies that are categorized as necessary are stored on your browser as they are essential for the working of basic functionalities of the website. We also use third-party cookies that help us analyze and understand how you use this website. These cookies will be stored in your browser only with your consent. You also have the option to opt-out of these cookies. But opting out of some of these cookies may affect your browsing experience.
Necessary cookies are absolutely essential for the website to function properly. This category only includes cookies that ensures basic functionalities and security features of the website. These cookies do not store any personal information.
Any cookies that may not be particularly necessary for the website to function and is used specifically to collect user personal data via analytics, ads, other embedded contents are termed as non-necessary cookies. It is mandatory to procure user consent prior to running these cookies on your website.


 USD $
USD $  BDT ৳
BDT ৳