 My Account
W3 Total Cache is a WordPress plugin that allows us to use this type of memory to accelerate the process of loading and website speed optimization.
Until today, it is the plugin that I use both on my website and in that of my clients to perform this task and I am very happy with the results.
However, it is also true that it is not the easiest to configure the plugin for those who perform this task and most users are scared to see the multiple options presented, opting finally not to use it.
But … that’s what I’m here for today. So that W3 Total Cache does not scare you anymore.
When you finish reading this article you will be able to optimize W3 Total Cache exactly as I have optimized it now in my blog site.
Keep reading. To website speed optimization and your SEO will thank you.
Start at the beginning, what is the cache?
From my point of view, it is very important not to do things to do them, but to know why we are doing them.
Therefore, answering this question seems fundamental to me.
The cache is a type of fast access memory that is found in most current computing devices.
Also on web servers or browsers that we use every day to connect to the internet.
Basically, this quick access memory what it does is store the data located in the main memory that are used more frequently to be able to access them more quickly. Allowing in this way to reduce the access time to said data in the computing device in question.
How does cache memory work on websites made with WordPress?
WordPress loads its pages dynamically and therefore the cache plays a key role in making this load faster.
I explain…
When you enter a website made with WordPress, the server has to interpret the PHP code through which the pages of the website are formed.
Once interpreted, it makes the necessary queries to the WordPress database so that it returns the necessary data and, in this way, the page loads correctly in HTML code.
Although this process is very fast, it is true that it takes longer to load than if the HTML code was directly implemented on the page (that is, without having to make any kind of PHP queries to the web server).
But at this point and to correct this is where the cache function comes in …..
The cache memory let’s say that it saves a previously generated view of the page so that it loads faster in the subsequent times it is visited, so that the process does not have to be repeated every time someone enters your web.
Advantages of Website Speed Optimization
I think that after explaining what the cache is and how it works in WordPress, you will begin to realize why it is so important to have a plugin correctly managed.
However, if you still do not have it too clear, I will emphasize the advantages of implementing a correct optimization of that memory.
By optimizing the cache in your WordPress you will be getting:
1. Decrease the use of the resources of your web server, since the HTML copies that are created in the cache will not make any request to the PHP server of our web hosting.
2. Only make requests that are strictly necessary to the server. For example, when you post new content, someone will leave a new comment on your blog, etc.
3. Improve the loading time of the web. And, consequently, the user experience.
4. Improve SEO, since loading time is one of the factors that Google takes into account when positioning any website.
5. That your website does not fall before a significant and punctual peak of traffic on your website, since the normal thing is that the resources of your server are limited and the cache will help you whether such temporary ones.
Configure W3 Total Cache to Website Speed Optimization and SEO of your WordPress
The theory is fine, but the practice is more fun and useful.
It’s time to teach you how to install and configure the W3 Total Cache plugin correctly as I have it configured in this blog.
1) Installation of W3 Total Cache
W3 Total Cache is free and can be found in the official WordPress plugin repository.
Therefore, as with any other plugin, you will only have to enter your WordPress administration panel and go to Plugins – Add new
Once there, in the search box enter the name of the plugin and click on Install now.
When the installation is finished, click Activate plugin and then automatically in your toolbar you will have access to the configuration of W3 Total Cache (the name that will appear will be Performance).

2) Configuration of W3 Total Cache
Before going 100% with the configuration, I want to clarify that I am not an expert on these caching issues.
However, I have tried several plugins and different configurations of this particular plugin.
After all these tests, the configuration that I will detail below is the one that has given me the best results.
This does not mean that there are no better ones. But, to this day, none has worked better for me than the one I’m going to put on next.
Let’s go with it …
2.1) General Settings
General
You do not have to touch anything. Leave everything as it comes by default.
Page Cache
Here you have to do a couple of things:
- Check the Page Cache box
- Select as cache method “Disk: enhanced”

Minify
Personally, when I activate my blog disappears and it is completely blank. From what I read in his day, it is something widespread that happens with many WordPress themes.
Apparently, this is an option that is not too well implemented in W3 Total Cache and gives many problems. But, if you want to active it then you have to make a full backup of your website. Minify option is very important to speed optimization for your website. So,

Database Cache, Object Cache, and Browser cache
These three I put them together because the only thing to do in them is to activate them all.
One corresponds to the database, another to the load functions for dynamic sites (as is our case with WordPress) and another refers to the browser cache.
Click on “Save all settings” to save all changes.
Once this is done, it is time to configure each of these options that we have just activated in the general options.

2.2 ) Page Cache
In this section, check the following boxes:
- Cache front page
- Cache feeds: site, categories, tags, comments
- Cache 404 (not found) pages
- Do not cache pages for logged in users

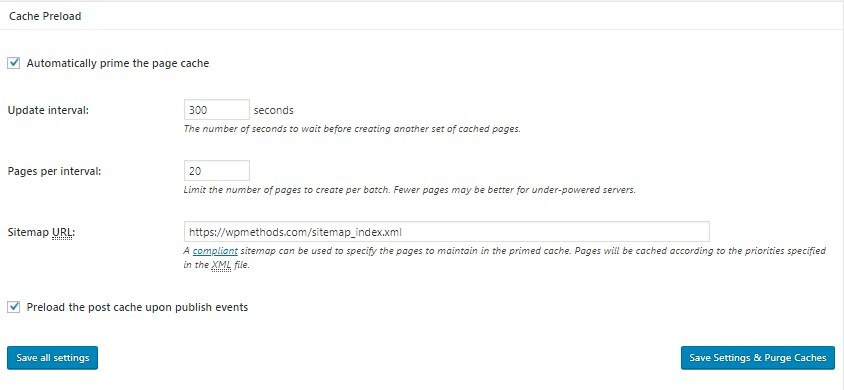
Then, activate the Cache Preload option and set the update interval in 300 seconds, 20 pages per interval and enter the address where you have your sitemap located.
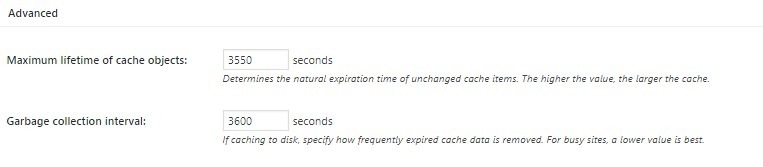
2.3) Database Cache
In this section you will only have to modify the first two data that appear:
Sets the maximum lifetime of the cache objects in 3550 seconds and the garbage collection interval in 3600.
Everything else leave it as you find it.
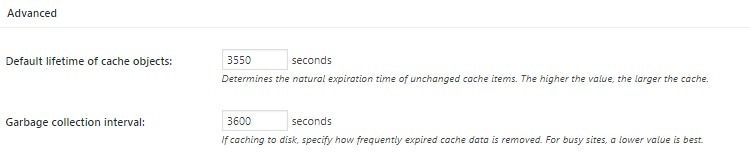
2.4 ) Object Cache
As you did in the previous point with the cache for the database, it establishes maximum lifetime of the objects and garbage collection interval in 3550 and 3600 seconds respectively.
2.5) Browser Cache
Turn of the browser cache.
And, for being the last section, this one is easy: do not modify absolutely anything and leave everything as it comes by default.
Or what is the same, you must leave the boxes “Set Last-Modified header” and “Enable HTTP (gzip) compression” activated.
2.6) Extensions
After the above, the rest of the options are more advanced. And if you do not know exactly what is being done, it is better not to touch them.
However, there is one that I do want to emphasize so you can keep an eye on it. This is the Extensions section.
Here you can find certain modules that W3 Total Cache brings with it to further improve the cache based on other elements used in your website or blog.
Some of them are very interesting, like Genesis Framework (at least for me it is, since my blog is made with Genesis) and WordPress SEO by Yoast.
The truth is that I activated these two that I commented and I have not noticed too much improvement in the times, so I ended up deactivating them.
But in your case, you may notice that your cache improves. Try and tell me in a comment.
If you are interested, tell you that you also have modules for CloudFare and Feedburner.
Ending…
With this is completed this review to which, under my modest point of view. Is the best cache plugin that exists for WordPress (or, at least, the best that I have tried).
After reading this article, I hope you have lost your fear once and for all to the tedious configuration of W3 Total Cache.
As always, I am open to comments that tell me your experience with this or other cache plugins for WordPress, whether you are going to start using it now or if you have been using it for a long time.


 USD $
USD $  BDT ৳
BDT ৳ 